
Streamline Your Data Entry: A Step-by-Step Guide to Adding Check Boxes in Excel
Checkboxes are an essential tool in Excel that can greatly enhance the data entry process. They provide a simple and intuitive way to input and organize data, making tracking and analyzing information easier. Check boxes allow users to quickly indicate whether a certain condition or criterion is met, saving time and reducing errors in data entry.
One key benefit of using checkboxes in Excel is their ability to streamline the data entry process. Instead of manually typing in values or selecting options from a drop-down menu, users can click on a checkbox to indicate their choice. This not only saves time but also reduces the risk of human error. Checkboxes also make it easier to visually scan and analyze data, as they indicate which options have been selected.
Understanding the Basics of Check Boxes in Excel
In Excel, check boxes are graphical objects that can be inserted into a worksheet. They typically represent binary choices, where the user can select either a “Yes” or “No” option. Checkboxes can be linked to cells, allowing users to easily see and manipulate the desired value.
There are two main types of checkboxes in Excel: Form Control checkboxes and ActiveX checkboxes. Form Control checkboxes are simpler and easier to use, while ActiveX checkboxes offer more advanced features and customization options.
Form Control checkboxes can be inserted from the Developer tab in the Excel ribbon. Once inserted, they can be resized and moved around the worksheet as needed. On the other hand, ActiveX check boxes require the Developer tab to be enabled and offer more advanced features such as event handling and custom macros.
Step 1: Creating a Check Box in Excel
To create a check box in Excel, follow these step-by-step instructions:
1. Open Excel and navigate to the worksheet where you want to insert the check box.
2. Go to the Developer tab in the Excel ribbon. If you don’t see it, you may need to enable it in the Excel options.
3. Click on the “Insert” button in the Controls group, and then select the check box icon from the Form Controls section.
4. Click and drag on the worksheet to draw the check box. You can resize and move it around as needed.
5. To edit the text next to the check box, right-click on it and select “Edit Text”. Type in the desired text and press Enter.
Alternative methods for creating checkboxes in Excel include using the “Check Box” option in the “Insert” menu or keyboard shortcuts. These methods may vary depending on your version of Excel.
Step 2: Customizing the Check Box Appearance
Excel provides several options for customizing the appearance of checkboxes. To customize a check box, right-click on it and select “Format Control”. This will open a dialog box where you can change the check box’s appearance.
In the “Control” tab of the Format Control dialog box, you can change the size and position of the check box, as well as adjust its alignment and orientation. You can also display a label next to the check box; if so, you can customize the label’s font, size, and color.
In addition to these basic formatting options, Excel allows you to apply more advanced formatting styles to check boxes. For example, you can change a check box’s fill color and border color or use special effects such as shadows or 3D effects.
Step 3: Linking the Check Box to a Cell
One of the key features of checkboxes in Excel is their ability to be linked to cells. This allows you to easily see and manipulate the selected value of a check box.
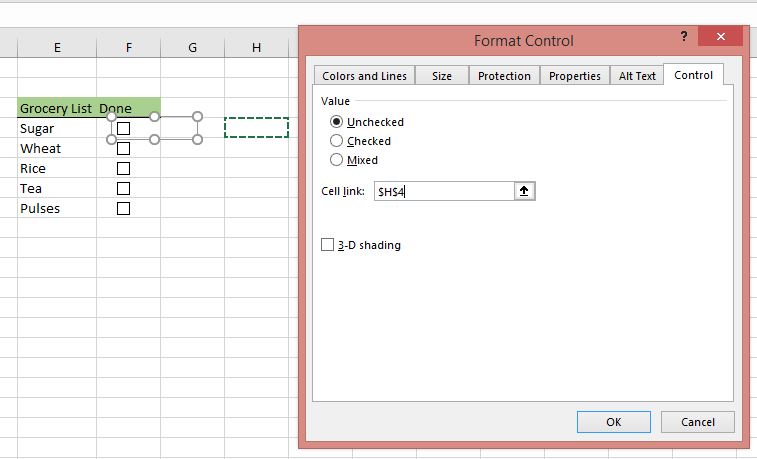
To link a check box to a cell, right-click on the check box and select “Format Control”. In the “Control” tab of the Format Control dialog box, you will see an option called “Cell link”. Click on the small icon next to this option, and then select the cell where you want to link the check box.
Once the check box is linked to a cell, the cell will display either a “TRUE” or “FALSE” value, depending on whether the check box is selected. You can use this value in formulas and calculations or as a visual indicator in your worksheet.
Linking checkboxes to cells provides several benefits. It allows you to easily manipulate the selected value of a checkbox by changing the value in the linked cell. You can also use the value chosen in formulas and calculations, making it easier to analyze and summarize data.
Step 4: Copying and Pasting Check Boxes
Excel provides several methods for copying and pasting checkboxes. The easiest way to copy a checkbox is to select it, press Ctrl+C to copy it, and then press Ctrl+V to paste it into another location. You can also use the “Copy” and “Paste” options in the right-click menu or the Excel ribbon.
When you paste a check box in Excel, it will retain its formatting and properties. If you have customized the appearance or linked a check box to a cell, these settings will be preserved when you paste the check box.
You can use Excel’s range selection feature to copy multiple checkboxes simultaneously. Click and drag to select multiple checkboxes, and then use one of the copy methods mentioned above to copy them.
Step 5: Using Check Boxes in Data Entry Forms
Checkboxes can be particularly useful in data entry forms, where users must quickly indicate whether certain conditions or criteria are met. They can streamline the process and reduce the risk of errors.
To use checkboxes in a data entry form, you can create a separate worksheet or section of your worksheet dedicated to the state. Insert checkboxes for each condition or criterion the user needs to indicate and link them to cells as described in Step 3.
You can also use Excel’s data validation feature to ensure only valid values are entered in the linked cells. For example, you can set up a data validation rule allowing only “TRUE” or “FALSE” values in the linked cell or create a custom formula that checks for specific conditions.
Using checkboxes in data entry forms provides several benefits. It makes it easier for users to indicate their choices quickly, reducing the time and effort required for data entry. Checkboxes also help ensure consistency and accuracy in data entry, as users are less likely to make mistakes when using them.
Tips and Tricks for Using Check Boxes in Excel
Here are some tips and tricks for using checkboxes in Excel:
1. Use descriptive labels: When creating checkboxes, use clear and descriptive labels that accurately represent the selected options. This will make it easier for users to understand and interpret the data.
2. Group-related checkboxes: If you have multiple related checkboxes or belong to the same category, consider grouping them. This will make it easier for users to locate and select the desired options.
3. Use conditional formatting: You can use Excel’s dependent formatting feature to apply different formatting styles to check boxes based on their selected value. For example, you can change the fill color of a check box to green if it is set or red if it is not.
4. Use checkboxes with other data entry tools: Checkboxes can be combined with other data entry tools, such as drop-down lists or text boxes, to provide a more comprehensive and flexible experience.
Troubleshooting Common Issues with Checkboxes
While checkboxes are generally easy to use, you may encounter some common issues. Here are some troubleshooting tips for these issues:
1. Check box not working: If the check box is not working as expected, ensure it is properly linked to a cell. Also, check that the cell is formatted correctly and contains no conflicting formulas or data validation rules.
2. Check box not visible: If it is not visible, it may be hidden behind other objects or cells. Try moving the check box to a different location or adjusting its size and position.
3. Checkbox formatting issues: If you are experiencing problems with checkboxes, such as incorrect colors or sizes, try resetting the formatting to the default settings. Right-click on the checkbox and select “Reset.”
4. Check box not printing: If check boxes do not print when you print your worksheet, ensure the “Print object” option is enabled in the Excel print settings. You can access these settings by going to the File > Print > Page Setup > Sheet tab.
How Check Boxes Can Streamline Your Data Entry Process
In conclusion, checkboxes are an important tool in Excel that can greatly enhance the data entry process. They provide a simple and intuitive way to input and organize data, making tracking and analyzing information easier.
By using checkboxes in Excel, you can streamline the data entry process and reduce the risk of errors. Check boxes allow users to quickly indicate whether certain conditions or criteria are met, saving time and effort. They also provide a clear visual indication of which options have been selected, making it easier to scan and analyze data.
In addition to their basic functionality, checkboxes in Excel offer a range of customization options and can be linked to cells for further analysis and manipulation. By following the step-by-step instructions and tips in this article, you can make the most of checkboxes in Excel and streamline your data entry process.


